Thursday, August 25, 2011

Sundial Peak (Lake Blanche Extension)

Sundial Peak is the dramatic peak that rises abruptly to the south-southeast of Lake Blanche.  As you gaze at its sheer face from Lake Blanche, the mere thought of climbing to its summit would seem next to impossible for the average hiker.  While the final stretch of this hike requires some careful scrambling, reaching the summit of this peak is easier than it appears.  Upon studying the USGS 1:24,000 scale topographic map, you will notice that Sundial Peak (not listed by name on the map) forms the terminus of a ridge that extends northward from a nameless 11,033-foot peak.  It is from this ridge that the easiest approach to the summit of Sundial Peak is made.
From the north shore of Lake Blanche, the route is accessed by crossing the dam on the right side (west end) of the lake.  The last time I hiked in this area there was a breach in the dam where the stream runs through it, which may require some careful negotiating to stay dry.  Once on the other side, head for the sloping terrace to the right (west) of Sundial Peak just below the hanging valley.  As you ascend this terrace parallel to the cliffs on your left (east), it will curve a little to the left into a small basin.  The hiking gets noticeably steeper at this point as you veer more to the left up a boulder-strewn slope into a higher basin.  In this higher basin the cliffs basically disappear, and you climb more of a vegetative steep slope in a northeasterly direction to the upper bowl of the hanging valley.  At this point, Sundial Peak comes into full view again – although much different looking than from Lake Blanche.  The upper bowl area provides a good spot to rest and/or have lunch before the final stretch of the climb.  From this area, work your way eastward towards the low point along the Sundial Peak ridgeline.  Once the ridgeline is gained and you start working your way northward towards the summit, the exposure becomes readily apparent – particularly off to the right (east).  While the ridgeline is passable to the 10,320-foot summit of Sundial Peak, careful, non-rushed traversing is required that's not for the faint of heart.  In the end though, you are rewarded with spectacular views in all directions.  Distance from the north shore of Lake Blanche is approximately 1.5 miles one-way (4.5 miles from the Mill B Trailhead) with an elevation gain of 1,450 feet (4,120 feet from the trailhead).
View looking north at Sundial Peak
from the upper bowl area
View of Lake Blanche and Mill B Fork
Canyon from the summit of Sundial Peak

Friday, August 12, 2011

Lake Blanche

One of my favorite hikes along the Wasatch Front is the hike to Lake Blanche.  This favoritism is shared by others as well as this hike is quite popular, particularly during the weekends.  Its pristine beauty with the imposing view of Sundial Peak as a backdrop makes this hike well worth the effort.  The local Wasatch Mountain Club actually uses the Sundial Peak backdrop as part of their emblem.  Lake Blanche is the largest of three lakes in the immediate area; the other two being Lake Florence and Lake Lillian.  As you climb near Lake Blanche, the evidence of the glaciers that formed this high mountain cirque becomes apparent as you notice the smooth grooves in the surrounding rock.  From left to right, the rugged summits of Monte Cristo, Sundial Peak, Dromedary Peak, and Sunrise Peak surround the three lakes.  To view all three lakes without much more increased effort, you can hike to the top of the knoll just northwest of Lake Blanche (marked as "8926" on the USGS 1:24,000 scale topographic map).
To reach the trailhead for Lake Blanche from the Salt Lake Valley, take the 6200 South exit (Exit 6) off of I-215 and turn right (at the light) onto Wasatch Boulevard (SR 190).  At Fort Union Boulevard (7200 South), turn left (east) to go up Big Cottonwood Canyon towards the Brighton and Solitude Ski Resorts.  At approximately 4.5 miles up the canyon, the "Mill B Trailhead" sign appears to your right (south) at the bottom of what's known as the S-Curve.  A parking lot is available to the right where the trail begins, or another parking lot is located in the upper bend of the S-Curve.  During busy times, it may be necessary to park along the highway.  At the east end of the lower parking lot, follow the paved foot path for about 0.2 mile to the Lake Blanche trailhead off to your right (south).  The trail climbs west of the stream and then crosses a bridge to the east side of the stream.  It then veers to the north for a bit and then switches south to enter into the Twin Peaks Wilderness Area.  About 1.5 miles into the hike, you will reach a beautiful clearing area before the final, steeper ascent to Lake Blanche.  While most guides and publications list the elevation of Lake Blanche at or slightly above 8,900 feet based on the topographic map, recent LIDAR (LIght Detection And Ranging) data actually puts it closer to 8,870 feet almost as though the 8,920-foot contour on the map got confused with the 8,880-foot contour.  Distance is approximately 3 miles one-way from the parking lot with an elevation gain of 2,680 feet.
Monte Cristo and Sundial Peak rise
abruptly above Lake Blanche
Dromedary and Sunrise Peaks rise
above Lakes Florence and Lillian


Thursday, July 28, 2011

Mount Olympus

For a more commanding view of the Salt Lake Valley and surrounding areas, Mount Olympus provides a great objective.  This is quite a popular hike, and winter ascents are often made to the summit.  Rising almost 5,000 feet above the valley floor, the hike to the summit of Mount Olympus can be quite demanding, but well worth the climb once you get to the top.  Since most of this hike is on a west-facing slope, the earlier morning hours provide the coolest time of the day to hike when the route is in the shade of the mountain.  To reach the trailhead, drive along Wasatch Boulevard in the vicinity of 5800 South (approximately 1/4 mile north of Tolcate Hills Road) where you should see a brown sign indicating the Mount Olympus Trailhead.  You can park along Wasatch Boulevard or in a parking lot just north of the trailhead.  Vandalism of vehicles has been known to take place by juveniles in the parking lot, so don't leave any valuables in your vehicle or if you feel more comfortable, park along Wasatch Boulevard.
The first section of the trail passes over private land, so stay on the trail as it switchbacks through the open grassy area above Wasatch Boulevard towards Tolcats Canyon.  After about a 1/2 mile, the trail crosses into the Mount Olympus Wilderness Area, which was established in 1984.  It's difficult to consider yourself hiking in a wilderness area when you turn and see the urban sprawl behind you, but the wilderness status was needed to protect the land.  Once you cross the usually dry creek bed of Tolcats Canyon, the trail climbs steeply through several vegetative zones to the ridge above.  It is not uncommon to see rattlesnakes in this area, so be alert.  By the time you reach the ridge at approximately 8,400 feet elevation, you're in the pine trees.  From this ridge it's a scramble of less than 1/4 mile to the left (north) to the 9,026-foot south summit of Mount Olympus.  Care must be taken in this area not to dislodge rocks onto hikers below.  While some sources put the one-way distance as high as 3.7 miles, based on my calculations, it is closer to 3.2 miles one-way with an elevation gain of 4,150 feet from the trailhead.  The north summit of Mount Olympus is 67 feet lower than the south summit, and requires more technical traversing to reach it from the south summit.  
View of downtown Salt Lake City from
the south summit of Mount Olympus
The two peaks of Mount Olympus ablaze
in sunset Photo credit: Joseph Bullough


Sunday, July 24, 2011

Neffs Canyon

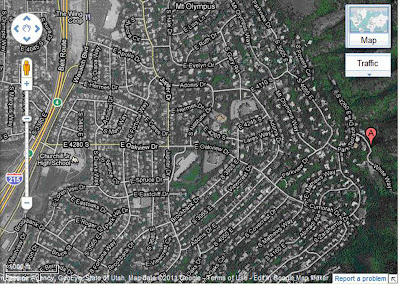
For a pleasant hike that's not real crowded with people (other than the neighborhood regulars), Neffs Canyon is a great destination to go.  Beginning at the Olympus Cove area on Salt Lake's east side, Neffs Canyon is the next canyon south of Mill Creek Canyon.  It runs along the north base of Mount Olympus, and has many springs flowing into it.  As a matter of fact, the famed "Mount Olympus Spring Water" comes from the springs in this area.  The trailhead is reached by turning east off of Wasatch Boulevard (towards the mountains) onto 4280 South, which eventually turns into Oakview Drive.  Turn left (northeast) onto Parkview Drive and then right (southeast) onto Park Terrace Drive.  Take another right (east) onto White Way and follow it to the end where there should be plenty of parking available.
Route to the Neffs Canyon trailhead
From the parking area, a well-marked trail heading to the east takes you to a graded service road, which rises along the north slope of the canyon for about a half-mile past a water tank.  At the end of the service road you reach a wide stream crossing where you can cross on rocks to the south side of the stream.  When hiking in this area as well as further up, you can't help but notice the huge rock slabs that form the north face of Mount Olympus jutting up to the right (south).  Stay on the most worn parts of the trail to reach the 8,000-foot meadow area, which is approximately 2.5 miles one-way from the parking area with an elevation gain of 2,400 feet.

A little known fact about the Neffs Canyon area is that it's home to one of the deepest caves in the United States.  At a measured depth of 1,186 feet, the cave is extremely dangerous and off limits to the novice spelunker.  The Forest Service has, in fact, closed off the cave to keep unauthorized people out.  Admission is granted only to experienced spelunkers.
The north face of Mount Olympus
taken near the mouth of Neffs Canyon
Rock outcrop at the Neffs Cave
entrance up Neffs Canyon


Saturday, July 9, 2011

Grandeur Peak

For a spectacular view of the Salt Lake Valley that's a little more involved than Ensign Peak, Grandeur Peak provides the perfect vantage point.  While this mountain can be accessed anytime of the year, I hiked it during October when the leaves were at their peak in changing color.

There are two common routes you can take to reach the summit of Grandeur Peak.  The West Ridge Route, which is the one I haven't taken, can be accessed from 3300 South and Wasatch Boulevard.  Head east to stay on Wasatch Boulevard where it will immediately turn north and parallel I-215.  Follow Wasatch Boulevard to its end where plenty of parking should be available.  The following link has more information:  http://climb-utah.com/WM/grandeur.htm.
Routes to Grandeur Peak Map credit: Joseph Bullough
The Church Fork Route is perhaps the more popular of the two.  This is accessed by driving up Mill Creek Canyon to the Church Fork picnic area, which is just past the Boy Scouts’ Tracy Wigwam area.  When I went, there was a fee of $2.25 per vehicle for accessing Mill Creek Canyon that is paid upon leaving the canyon.  I understand that the fee is $3.00 per vehicle now, and an annual pass of $40.00 can be purchased if the canyon is visited frequently.  A narrow road winds through the Church Fork picnic area to the trailhead.  Parking is limited in this area, so be prepared to park on the main road, if necessary.  From the trailhead, the trail heads north along Church Fork and crosses a trail known as the Pipeline Trail.  As Church Fork veers to the right (east), the trail goes through several switchbacks before it reaches the crest of the ridge.  From here you begin to have a commanding view of Parleys Canyon and the Salt Lake Valley.  Following the ridge, it’s about another half-mile to the 8,299-foot summit of Grandeur Peak.  Distance from the trailhead to the summit is about 2.7 miles one-way with an elevation gain of approximately 2,350 feet.
View of downtown Salt Lake City
from the summit of Grandeur Peak
View of Mount Olympus and the Cove
area from the summit of Grandeur Peak


Thursday, February 3, 2011

The Six Corners of Utah (Part 2)

My desire to visit all of the six corners of Utah began in earnest before I visited the three corners of Colorado, Utah, and Wyoming.  I was working for the BLM (Bureau of Land Management) out of Rock Springs, Wyoming, and part of my duties involved looking for section corners to survey fence lines.  These section corners usually varied from a pile of carefully arranged rocks on the ground to brass-capped monuments with the associated coordinates engraved on top.  I figured that if surveyors went to the trouble of marking section corners on the ground, then the remaining state corners ought to be marked as well.  It soon became something that I just had to find out.

Three Corners (Arizona, Nevada, & Utah)

The tri-state corner of Arizona, Nevada, and Utah was the fourth of Utah’s six corners I visited.  It is located about thirteen miles north of Mesquite, Nevada, and is the lowest of the six corners at 2,554 feet elevation.  I reached this corner by driving north from Littlefield, Arizona, on a graded road to a fence line that marked the Arizona-Nevada border.  After parking the vehicle, I hiked along the fence line for about a mile until I reached the monument.  It has “WL 37” engraved below “Nevada” on the west side of the monument, which refers to the 37th meridian west of Washington DC.
The sandstone monument of
Arizona, Nevada, & Utah

Three Corners (Idaho, Utah, & Wyoming)

The tri-state corner of Idaho, Utah, and Wyoming was the most difficult of the six corners to locate.  At the time, it consisted of only a rock with “WYO” engraved on the east side, and the township/range coordinates of Utah and Idaho engraved on the south and west sides, respectively.  It has since been replaced with a more permanent monument.  I reached this corner by taking a dirt road out of Cokeville, Wyoming, and hiking along a fence line that I suspected to be the Utah-Wyoming border, which it was.
The Idaho & Utah side of the tri-state
corner of Idaho, Utah, & Wyoming
The Wyoming side of the tri-state
corner of Idaho, Utah, & Wyoming


Three Corners (Idaho, Nevada, & Utah)

The last of the six corners of Utah I visited was the tri-state corner of Idaho, Nevada, and Utah back in 1989.  I had my hiking partner, Joe, with me during the trek.  Accessing this corner involved having a good map and following a maze of dirt roads from the “City of Rocks” area of Idaho.  We eventually reached the Goose Creek area where we parked the vehicle next to a fence line marking the Utah-Idaho border.  We then hiked west along the fence line for at least 2 1/2 miles one way to reach the monument.  It is interesting to note that the prescribed location set for this corner was the intersection of the 42nd parallel of latitude with the 37th meridian west of Washington DC, yet as surveyed, the monument actually sits approximately 3,300 feet southeast of this point.  This gives Idaho and Nevada slightly more territory and Utah slightly less territory.  The question then arises: Why are not errors like this corrected when discovered?  Answer: Once a boundary is surveyed on the ground and accepted by all interested parties, it is a true line even though it doesn't follow the written description precisely.
The point of intersection between
Idaho, Nevada, & Utah
The tri-state corner of
Idaho, Nevada, & Utah

Monday, January 24, 2011

The Six Corners of Utah (Part 1)

Utah is one of three states in the United States whose boundaries are determined entirely by latitude and longitude.  With the creation of Utah Territory back in 1850, it stretched from the continental divide in the east to the present-day California-Nevada border in the west, and from the 42nd parallel of latitude in the north to the 37th parallel of latitude in the south.  By 1868, Utah Territory had been whittled down to its present-day size by the creation of Colorado, Nevada, and Wyoming Territories.  It is interesting to note that back in the early history of the United States; many territorial boundaries were determined by meridians east and/or west of Washington DC – not from Greenwich, England.

Four Corners (Arizona, Colorado, New Mexico, & Utah)

The Four Corners monument was the first of Utah’s six corners that I visited back when I was a child on a family vacation.  It is the easiest of the six corners to reach by motor vehicle on paved roads.  Today the Four Corners area is managed by the Navajo Parks and Recreation Department, which is part of the Navajo Nation.  Be prepared to pay $3.00 per person to access the Four Corners monument.  There are lots of shops in the area that sell local homemade craft items.
Metal cap marking the junction of
Utah, Colorado, Arizona, & New Mexico

The Southwest Corner of Wyoming (Utah & Wyoming)

The monument marking the southwest corner of Wyoming was the second of Utah’s six corners I visited.  Other than Four Corners, this is the only state corner I have visited more than once.  It is located next to a graded road near an energy plant in the Chalk Creek drainage.  All motorized vehicles can access this monument in dry conditions.  From I-80, take the Coalville exit and then turn east on the road that heads up the Chalk Creek drainage.
A sandstone pillar marks the
southwest corner of Wyoming

Three Corners (Colorado, Utah, & Wyoming)

The tri-state corner of Colorado, Utah, and Wyoming is the highest of Utah’s six corners at 8,402 feet elevation.  It is located at the end of a primitive dirt road that’s best accessed by high-clearance vehicles in dry conditions.  I visited this monument back in 1984 when we lived in Wyoming.  Since I didn’t have a high-clearance vehicle then, I had to park over a mile away and hike to this location.  Three flag poles (one in each state) have been erected next to this monument by the Bureau of Land Management.  An erected sign in the Utah sector gives a detailed description of the monument.
View of the Colorado, Utah, &
Wyoming monument area
The point of intersection between
Colorado, Utah, & Wyoming