Friday, December 27, 2013

The Living Room

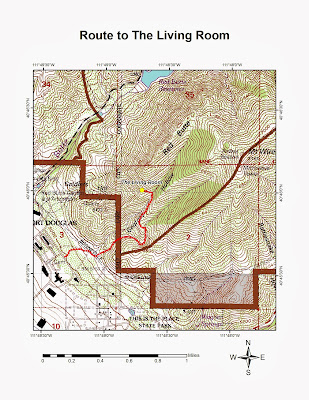
Several months ago I overheard my daughter and her boyfriend talk about a place called, "The Living Room."  I didn't take much notice at first, thinking that it was just some imaginary place in the back of someone's mind.  After all, I've done a fair amount of hiking along the Wasatch Front, and surely I would have heard of this place if it was very popular  right?  Well, one day when I had a little time on my hands I decided to research this place to see if it really existed.  Exiting I-80 at Exit 129 onto Foothill Drive (or I-215 from the south), I drove northward along Foothill Drive and then veered to the right (northeast) onto Wakara Way.  Continuing along Wakara Way, I turned right again (southeast) onto Colorow Drive, where I parked alongside the road just beyond Tabby Lane.  Be sure to park before the "No Parking" signs to avoid possible ticketing.  A small trailhead sign sits along the east side of Colorow Drive not far from the "No Parking" signs.
The trail starts in a brief wooded area and climbs to a clearing near the Bonneville Shoreline Trail, where various trails begin to appear.  Basically, you will need to head for the drainage just to the right (south) of the main Georges Hollow drainage.  Be careful not to crosscut areas where vegetation restoration is taking place.  Once at the mouth of the lesser drainage, a well-marked trail ascends this drainage for about 0.5 miles to the top of the ridge with Georges Hollow.  From here the trail continues to climb another 0.4 miles across Georges Hollow to a point known as the Living Room at just over 6,000 feet elevation.  The Living Room is merely slabs of stone made to look like living room furniture, where hikers can sit, relax, and take in the views of the valley below.  Further down the slope lies an old quarry structure, which is part of the Red Butte Garden complex.  With a good set of binoculars, it is possible to watch a Utah football game at Rice-Eccles Stadium.  Distance from the trailhead to the Living Room is approximately 1.2 miles one-way with an approximate elevation gain of 1,000 feet.  Continued scrambling up the ridge above the Living Room will take you to the Red Butte ridge.
The Living Room equipped with
an old television remote
View of the Salt Lake Valley and Oquirrh
Mountains from the Living Room

Thursday, October 10, 2013

Length of Day for Hiking and Trekking

Length of day generally refers to the period when the edge of the sun rises from the eastern horizon to when it sets in the western horizon.  It can vary greatly throughout the year depending upon the latitude of the hiking/trekking area.  The further you get away from the earth's equator, the greater the variation in day length throughout the year.  Atmospheric refraction affects the length of day by bending the sun's light, adding a few additional minutes to the beginning and ending of each day-length period.  It makes the sun and other astronomical objects appear higher in the sky than they really are, and often distorts and causes a shimmering or rippling effect to these objects (see photo).  Once the sun does set and before it rises, a condition known as "civil twilight" exists for a limited period, allowing most outdoor activities to continue under clear atmospheric conditions.  Civil twilight is defined as beginning in the morning (civil dawn), and ending in the evening (civil dusk) when the center of the sun is geometrically six degrees below the horizon.  More information about twilight can be found at the U.S. Naval Observatory website at: http://aa.usno.navy.mil/faq/index.php
Distortion of the sun caused
by atmospheric refraction 
Photo credit: www.birdsasart.com
Determining the length of time it takes to complete a hike or a trek depends largely upon a person's health, strength, and walking pace.  One person's travel time may vary much differently than another person's travel time.  This is why I don't usually include times to complete a hike or a trek in my posts.  Another factor affecting travel time is the type of terrain and/or vegetation a particular route goes through.  Level, well-established trails, for example, take a shorter time to travel than areas of bushwhacking, scrambling, and steepness.  With regard to determining day length, most sunrise and sunset tables are based off of time zone longitudinal meridians  particularly the prime meridian (0° longitude).  Coordinated Universal Time (UTC) is calculated from the prime meridian, and it is recognized as the official reference for time zones throughout the world.  Most of the hikes and treks listed in my posts fall into the Mountain Time Zone, which is seven hours earlier (-7) than UTC at 105° west longitude.  The table below, however, identifies the time zone meridians throughout the world in half-hour increments.
While most time zones vary in whole-hour increments from UTC, there are a few (such as the Newfoundland part of Canada, Afghanistan, India, and Iran) that vary in half-hour increments from UTC.  Close examination of the table reveals that one hour of time equals fifteen degrees of longitude, or (further divided) one minute of time equals fifteen minutes of longitude.  This is important to know when adjusting sunrise and sunset times from a table to the planned travel area.  Once the time zone and its meridian have been identified, the difference between it and the travel area longitude can be calculated.  Time is added for areas west of the time zone meridian while time is subtracted for areas east of the time zone meridian.  For example, a travel area located at 111° 45' west longitude in the Mountain Time Zone (105° west longitude) would have a difference of 6° 45' longitude, or 27 minutes of time.  Since the travel area lies further west than the time zone meridian, the 27-minute time difference would be added to the sunrise and sunset times in the table.  Another one hour would also be added if the area was observing Daylight Saving Time  making the total added time 1 hour and 27 minutes.  The table below lists the sunrise and sunset times throughout the year for much of the world.
Though the times may vary slightly from year to year (including leap years), it should not be by more than two or three minutes for the next 20 years or so.  Sunrise and sunset times can also be adjusted for travel areas between two latitudes.  For example, a hike taken during August in a hiking location of 41° north latitude; the sunrise and sunset times for both 40° and 45° north latitude are used in the calculation.  The sunrise times for August are 05:13 for 40° and 05:03 for 45°, making a difference of 10 minutes.  Likewise, the sunset times for August are 18:54 for 40° and 19:03 for 45°, making a difference of 9 minutes.  Since 41° is one-fifth of the way between 40° and 45°, two minutes (1/5 of 10) are subtracted from the sunrise time for 40° while approximately two minutes are added to the sunset time for 40°  resulting in 05:11 and 18:56, respectively, for 41°.  Keep in mind that the times listed in the table above denote monthly averages and can vary depending on the day during the month.  Knowing the length of day is an important factor for planning hikes and treks.

Saturday, September 28, 2013

White Pine Lake

White Pine Lake is a remote alpine lake situated near the end of the White Pine Fork of Little Cottonwood Canyon.  Near the beginning of the twentieth century a four-wheel drive road was constructed up the drainage to service small mining claims in the area.  Once the mining stopped the Forest Service closed the road to all motorized vehicles, and the vegetation has since reclaimed much of the traveled route.  Today the old road forms the trail leading to White Pine Lake.  Though longer than really necessary, the trail isn't as steep as other trails  taking advantage of switchbacks along the steeper slopes.  In 1978 the Lone Peak Wilderness Area was established under the Endangered American Wilderness Act.  At that time the White Pine Fork drainage was included as part of the wilderness proposal, but lobbyists representing nearby ski resorts succeeded in having this area excluded.
To reach the White Pine trailhead from the Salt Lake Valley, take the 6200 South exit (Exit 6) off of I-215 and turn right (at the light) onto Wasatch Boulevard (SR 190).  Continue south along Wasatch Boulevard past Fort Union Boulevard (7200 South), which turns into SR 210.  Follow SR 210 to the White Pine parking area (about 9.3 miles from Fort Union Boulevard) to the right (south) of the highway.  This same area can be reached from I-15 by taking the 9000 South exit (Exit 295) and turning eastward towards Sandy along 9000 South (SR 209).  The road eventually curves southward and then eastward again as 9400 South  weaving a little more before it terminates at approximately 7.3 miles from the I-15 exit.  At the junction, turn right (eastward) and follow SR 210 the rest of the way to the White Pine parking area (approximately 5.3 miles from the junction).  Since this is a popular hiking area, be prepared to park along the highway should the parking area be full.
Looking across Little Cottonwood Canyon
to Monte Cristo and Mount Superior
The Broads Fork Twin Peaks rise above
the horizon behind White Pine Lake
The trail begins near the restrooms along the south side of the parking area.  It descends about 40 feet to cross Little Cottonwood Creek before climbing the other side of the canyon towards White Pine Fork.  After approximately one mile of hiking, the White Pine Fork is reached and the trail splits  where you will take the left trail to White Pine Lake up the switchback.  An information sign with important guidelines is located at the trail junction.  About 0.3 miles beyond the split at the end of the first switchback (see map), a viewpoint is reached where much of Little Cottonwood Canyon can be viewed into the Salt Lake Valley.  Continuing up the drainage, the trail passes through several meadows where wildflowers abound during the late summer months.  The final mile of the hike is mostly above the timberline and becomes quite rocky in places.  After reaching a pass on top of a ridge at approximately 10,160 feet elevation, the trail makes a surprise descent of about 180 feet to reach the lake.  While a return route is possible to the trail below without having to re-ascend the trail to the pass, be prepared for some scrambling over large boulder fields.  Distance from the White Pine trailhead to White Pine Lake is approximately 5.0 miles one-way with an elevation gain of approximately 2,550 feet (followed by a 180-foot loss).
View of White Pine Lake
near the south shoreline
Looking south across White Pine Lake
with White Baldy in the background

Friday, September 6, 2013

Twin Peaks (Cecret Lake Extension)

The Twin Peaks referred to in this post are the American Fork Twin Peaks near the Snowbird Ski Resort in Little Cottonwood Canyon.  Though not nearly as impressive to look at as the Broads Fork Twins are from the Salt Lake Valley, the American Fork Twins are the highest points in Salt Lake County.  Nearby to the northeast lies Hidden Peak which forms the upper terminus of the Snowbird Ski Tram.  Considering all the traffic this area receives, Hidden Peak is probably the most summited mountain in the Wasatch Range.  Of course, the easiest approach for climbing Twin Peaks with the least amount of elevation gain is from Hidden Peak.  The description here, however, is the route we took from Cecret Lake.
From the east side of Cecret Lake, follow the ridgeline on the right (north) of the lake to begin the route to Twin Peaks.  While climbing the higher ridge northwest of the lake, look for the chairlift and head towards it.  There is an obvious service road below that leads to it, passing very close to Cecret Lake.  Upon reaching the chairlift, follow the route up to the saddle between Mount Baldy and Sugarloaf Peak.  From this saddle two 11,000-foot peaks (Mount Baldy and Sugarloaf Peak) are only short scrambles away  ranging from one-third to one-half mile one-way.  Continuing on to Twin Peaks, we descended a couple of hundred feet into Mineral Flat on the American Fork side.  Here you have a great view of Mount Timpanogos to the south and our final destination off to the southwest.  We then made our way across Mineral Flat towards the southwest and came across a service road which switchbacks up the back side of Hidden Peak.  If you plan the route carefully, you can follow one of the switchbacks for approximately 0.2 miles along the mountainside.  Beyond the service road, we made our way laterally across a steepening slope to the low point of the saddle before East Twin Peak.  Once at the saddle it's a steep scramble with some exposure to the 11,433-foot east summit.  The west summit lies some 0.3 miles further west at 11,489 feet elevation.  Hiking between the two summits is easy with minimal elevation change.  Keep an eye open for explosive casings used for avalanche control, and stay away from them as they may still contain explosive material.  Distance from Cecret Lake to the west summit of Twin Peaks is about 2.8 miles (3.6 miles from the trailhead) one-way with an elevation gain of approximately 2,050 feet (2,510 feet from the trailhead)  taking into account a 420-foot loss.
American Fork Twin Peaks from the saddle
between Mount Baldy and Sugarloaf Peak
On the return route, we hiked to Hidden Peak where we were able to catch a free ride down on the Snowbird Tram.  Fortunately we came across a kind couple who gave us a ride from the base of Snowbird back to the trailhead where our vehicle was parked.
The back side of Hidden Peak
with the top of the Snowbird Tram
The Broads Fork Twin Peaks from
the American Fork Twin Peaks

Tuesday, August 27, 2013

Cecret Lake

Cecret Lake provides a short, beautiful hike at high elevation that can be taken by the entire family.  Located near the end of Little Cottonwood Canyon, the lake is a small glacial tarn that forms part of the headwaters for Little Cottonwood Creek.  Devils Castle and Sugarloaf Peak rise abruptly to the south of Cecret Lake, providing a scenic backdrop.  Since the area is a vital watershed for the Salt Lake Valley, dogs and horses are prohibited in Albion Basin and the rest of Little Cottonwood Canyon.  Older USGS topographic maps show the lake as "Secret" Lake, and though pronounced the same; the more common spelling is "Cecret" Lake.  All things considered  it offers a great escape from the summer heat in the valley below along with the hustle and bustle of city life.
The trailhead to Cecret Lake next
to the Albion Basin Campground
Alta and the Albion Basin are reached from the Salt Lake Valley by taking the 6200 South exit (Exit 6) off of I-215 and turning right (at the light) onto Wasatch Boulevard (SR 190).  Continue south along Wasatch Boulevard past Fort Union Boulevard (7200 South), which turns into SR 210.  Follow SR 210 the rest of the way to Alta (approximately 12.0 miles from Fort Union Boulevard).  From I-15, take the 9000 South exit (Exit 295) and turn eastward towards Sandy along 9000 South (SR 209), which eventually curves southward and then eastward again as 9400 South.  SR 209 weaves a little more before it terminates at approximately 7.3 miles from the I-15 exit.  At the junction, turn right (eastward) and follow SR 210 the rest of the way to Alta (approximately 8.0 miles from the junction).  About 0.3 miles beyond Alta, the highway forks with the lower right portion leading to a parking area.  During busy times you may be directed to park there and take a shuttle the remaining distance to the trailhead.  If not, continue up the left fork, which turns into a maintained dirt road for approximately 2.5 miles to the Albion Basin Campground.  Parking is available off to the left before entering the campground.

The trail begins near the campground entrance and continues southward, passing underneath a chairlift.  Interpretive signs describe various natural features along the way, allowing brief resting stops.  The steepest part of the hike is the final quarter-mile portion, which switchbacks up the mountainside to reach Cecret Lake at approximately 9,860 feet elevation.  Don't be surprised to see occasional vehicles near the beginning of the trail as private cabins are located in the area.  Distance from the trailhead to Cecret Lake is approximately 0.8 miles one-way with an elevation gain of about 460 feet.
Cecret Lake as viewed from a point
near the north shoreline
View looking southeast across Cecret
Lake with Devils Castle in the background

Wednesday, July 10, 2013

Mount Superior & Monte Cristo

Shifting back to the Wasatch Mountains, Mount Superior and Monte Cristo are two high points along the Cottonwood Ridge between Big and Little Cottonwood Canyons.  These two peaks provide a dramatic backdrop to the north and west of the Alta and Snowbird ski resorts.  During the winter months, this area is often the scene of controlled avalanches in an effort to make the canyon road and ski resorts safe to use.  Upon looking at the official USGS topographic map, what is listed as "Superior Peak" is actually known as "Monte Cristo" by the locals, and the point known as "Mount Superior" sits about one-quarter-mile eastward of "Monte Cristo" (see map).  Since I'm local to the Salt Lake area, I will refer to the area as the locals refer to it.  While these two peaks can be reached from the Big Cottonwood side via Lake Blanche, the easier approach is from the Little Cottonwood side starting in the town of Alta.  Some scrambling is required along the ridgeline with moderate exposure.
To reach Alta from the Salt Lake Valley, take the 6200 South exit (Exit 6) off of I-215 and turn right (at the light) onto Wasatch Boulevard (SR 190).  Continue south along Wasatch Boulevard past Fort Union Boulevard (7200 South), which turns into SR 210.  Follow SR 210 all the way to Alta (approximately 12.0 miles from Fort Union Boulevard).  From I-15, take the 9000 South exit (Exit 295) and turn eastward towards Sandy along 9000 South (SR 209), which eventually turns southward and then eastward again as 9400 South.  SR 209 weaves a little more before it terminates at approximately 7.3 miles from the I-15 exit. At the junction, turn right (eastward) and follow SR 210 the rest of the way to Alta (approximately 8.0 miles from the junction).  Near the mouth of Little Cottonwood Canyon lies a huge vault carved into the granite that stores extensive genealogical records.  Some of the granite in this area was quarried in earlier days for construction of the Salt Lake LDS Temple, and more recently the Conference Center.  While the grandeur of this canyon may be eye-catching, be sure to keep your eyes on the road while driving, and watch out for bicyclists.  Upon reaching Alta, look for the Shallow Shaft Restaurant along the left (north) side of the highway, where there should be parking space available.
View looking southeast towards Alta and
the Albion Basin from Cardiff Pass
View looking west to Mount Superior
from a knoll just west of Cardiff Pass


The route to Mount Superior begins at the road left (west) of the Shallow Shaft Restaurant.  Follow the road as it curves through the structures, keeping to the right for about 0.2 miles.  Veer to the left (northward) onto an unimproved road that climbs westward to a hill towards Cardiff Pass.  At approximately 0.8 miles from the starting point, take the trail extending left (west) of the road and follow it for about 0.6 miles to reach Cardiff Pass.  An effective guide to keep you on course is to generally follow the power lines that lead up to the pass.  Situated at just over 10,000 feet elevation, Cardiff Pass offers a great view of Alta and the Albion Basin below, and provides a great stopping point for those who don't want to hike the whole way.  Continuing on to Mount Superior, follow the apparent trail along the ridge to the left (west) of Cardiff Pass, which will skirt to the south of a point listed as "10277" on the map.  Upon rounding the ridge, Mount Superior comes into view straight ahead, which isn't as daunting as it appears.  Keep following the indistinct trail that traverses along the Little Cottonwood side of Cottonwood Ridge.  While exposure along this part of the route is not particularly high, care should be taken not to slip on loose rock and fall to the steeper slopes below.  The final half-mile of the hike involves scrambling up a rock slope with an elevation gain of about 1,000 feet.  A false summit is passed along the way before reaching the true summit of Mount Superior at approximately 11,050 feet elevation.  Distance from the starting point to the summit is approximately 2.5 miles one-way with an elevation gain of approximately 2,500 feet (taking into account a 1,000-foot gain after a 100-foot loss).  When I reached Mount Superior's summit I had planned to hike the short distance to reach Monte Cristo's summit, but billowing clouds looked threatening and I chose not to chance it.  Monte Cristo is situated another quarter-mile further west along Cottonwood Ridge.  Reaching its 11,132-foot summit involves a 160-foot elevation gain after an 80-foot loss from Mount Superior.
View looking west to Monte Cristo
from the summit of Mount Superior
View looking towards Lake Blanche and Big
Cottonwood Canyon from Mount Superior

Saturday, June 15, 2013

Lowe Peak

South of the Bingham Canyon Mine, the Oquirrh Mountains are much more spectacular and offer greater scenic beauty.  In the higher elevations, it is not uncommon to see herds of deer and elk, and watch hawks soar overhead.  Among the half-dozen or so peaks that rise above 10,000 feet elevation, Lowe Peak sits as the second highest point in the entire Oquirrh Range.  From the Salt Lake Valley, Lowe Peak is recognizable along the southwest horizon if you know where to look (see photo below).  As with the northern part of this mountain range, what public land that remains in the southern part is also administered by the BLM.  Ophir Canyon on the west side of the range provides the easiest access to the Lowe Peak area, which allows you to drive through the little town of Ophir.  If you happen to be into mining history and have a little extra time, take a good look around Ophir  it's quite a fascinating place.  There are also a few camping sites in Ophir Canyon located between the town and the trailhead should you choose to spend the night.  Check for camping availability and restrictions beforehand at the restored Ophir Town Hall and respect private property.
To reach the trailhead for Lowe Peak from the northern part of the Salt Lake Valley, take I-80 west to the Tooele City exit (Exit 99).  Take the exit onto SR 36 and drive southward approximately 24.1 miles through Tooele and Stockton.  Turn left (eastward) onto SR 73 and continue for approximately 4.6 miles to Ophir Canyon Road.  Make another left (east) turn onto Ophir Canyon Road and drive for about 3.5 miles through the town of Ophir to reach the trailhead.

From the southern part of the Salt Lake Valley, take Redwood Road (SR 68) southward through Bluffdale and Camp Williams and turn right (west) onto SR 73.  Continue on SR 73 for approximately 31.6 miles through Cedar Fort and Fairfield to reach Ophir Canyon Road.  Turn right (east) onto Ophir Canyon Road and drive for about 3.5 miles through the town of Ophir to reach the trailhead.  The road turns to dirt upon leaving Ophir up the canyon, but most vehicles can make it.
Lowe Peak as viewed from the South
Valley Regional Airport (Airport #2) in
the Salt Lake Valley
Hiking up a drainage on the
southwest face of Lowe Peak –
Photo credit: Aaron Oliver


The trail begins by crossing the stream on logs and rocks to the other side.  This is repeated a dozen times or so for the first mile-and-a-half of the trail in the lower part of the canyon.  During runoff conditions, be prepared to get your feet wet as the stream can be running quite high.  We also came across some grazing cattle and their evidence of "cow pies" along the trail.  At about 1.5 miles, a meadow comes into view towards Lowe Peak (eastward), where you will veer from the trail to begin the climb up the drainage.  This is the steepest part of the hike where over 2,000 feet of elevation is gained in a little more than a mile.  Don't be ashamed to take frequent rests along the way and take in the spectacular views unfolding before you.  Keep an eye out for deer and elk herds on the upper slopes.  After hiking up the drainage for awhile, eventually work your way to the ridge on your left (northward).  When the main ridgeline is finally reached and the Salt Lake Valley comes into view, hike up the remaining ridge to reach the summit.  Distance from the trailhead to the 10,589-foot summit of Lowe Peak is approximately 2.8 miles one-way with an elevation gain of approximately 3,500 feet.  When we descended Lowe Peak, we dropped about 800 feet to a saddle northwest of the peak and followed the upper drainage back into Ophir Canyon, which added another 0.7 miles to our route.  Another option can be to also ascend Rocky Peak (500 feet elevation gain from the saddle) and descend by way of a ridge slightly west and to the south of the Rocky Peak summit.  This adds an additional one mile to the original Lowe Peak route.
View looking south over Flat Top
Mountain (31 feet higher) from Lowe Peak
View looking northwest over Rocky Peak
to the Stansbury Range from Lowe Peak

Wednesday, May 29, 2013

Nelson Peak

Nelson Peak is the highest point in the northern Oquirrh (pronounced "o-ker") Mountains north of the Bingham Canyon Mine.  It is a prominent point when viewed from the Salt Lake Valley; being the least cluttered with communication towers of the high points along the northern Oquirrh Range.  Access to this peak from the east side is very limited due to private property  mainly from the mining industry that first developed in Utah during the 1860s.  By the time the U.S. Forest Service came into existence near the end of the nineteenth century, practically no public land remained along the eastern slopes of the Oquirrh Mountains.  While most people consider Nelson Peak to be prohibited from climbing, much of the western slopes of the range are public land administered by the BLM.  The Tooele side, therefore, is the best approach to reaching Nelson Peak.  When I hiked it, we basically followed the ridgeline between Bates and Pole Canyons.
To reach the starting point we took for Nelson Peak, take the Tooele City exit (Exit 99) off of I-80 onto SR 36.  Once off the freeway, continue southward on SR 36 for approximately 5.1 miles and then turn left (east) onto Bates Canyon Road (there's actually a traffic light now).  Follow Bates Canyon Road for about 1.3 miles until it crosses the railroad tracks, where it turns to dirt.  Straight ahead several hundred feet beyond the tracks is a turnaround loop off to the left (north) where vehicles can be parked well off the road.

The hike begins by following the dirt road beyond the gate towards the northwest.  Since this area is private property, great care should be taken to respect it by staying on the dirt roads as much as possible.  Make your way towards the small ravine and then climb the left (north) side of it.  Continue following the road as it ascends the ridge between Bates and Pole Canyons.  When the road begins to veer into Pole Canyon, continue ascending the ridge past the points listed as "7736" and "9175" on the map.  Where there is no established trail to the summit of Nelson Peak, this will require some route-finding through the least timbered areas along the ridge.  During the summer months, early-morning hours are the best time to hike up the western slopes to avoid the heat of the day.  Watch out for possible rattlesnakes, use sunscreen, and bring plenty of water as there are no fresh water sources along the route.  Back when I hiked it during the autumn, we ran into fresh snow at about the 7,000-foot level.  Distance from the starting point to the 9,359-foot summit of Nelson Peak is approximately 5.3 miles one-way with an elevation gain of approximately 4,780 feet.
View of Nelson Peak taken
near the "9175" point
View of communication tower
from the summit of Nelson Peak

Thursday, May 9, 2013

Stansbury Island

Stansbury Island is situated at the southern end of the Great Salt Lake approximately 28 miles west of Salt Lake City as the crow flies.  It was named for Howard Stansbury, who led a government expedition to survey the area during the mid-nineteenth century.  Depending on the level of the Great Salt Lake, it can be a true island connected by an earthen causeway, or merely a peninsula jutting up from the south shoreline.  Near the center of the island is its highest point, which is low by Wasatch Mountain standards, yet it rises over 2,400 feet above the present-day lake level.  Stansbury Island is not a popular place to visit  mainly due to accessibility, remoteness, and the fact that there are no real forested areas.  It does, however, provide a great place to hike and mountain bike during the early spring and late autumn months when the higher elevations of the Wasatch are covered in snow.  While most of the interior of the island is public land under BLM (Bureau of Land Management) jurisdiction, some of the perimeter is privately owned by mineral extracting companies and ranchers.  The trick, therefore, comes in hiking and biking in this area without infringing too much on private property.  Since there are no clean water sources on the island, it will be necessary to bring plenty of drinking water along with sunscreen and some insect repellent.
To reach Stansbury Island coming from the east, take the second Grantsville exit (Exit 84) along I-80 and continue straight onto the dirt road, or the first Grantsville exit if coming from the west – turning right (north) under the freeway overpasses to reach the dirt road.  Follow the good-conditioned dirt road approximately 3.9 miles over two railroad tracks (each with a stop sign) and along the causeway to reach a wooden BLM sign on the island.  Here the road forks with the left (west) fork being the main road.  If you continue along the main road for about 3.4 miles past the BLM sign, a fence line (with a cattle guard) is reached that marks private property.  While public access is allowed along the road beyond this point, you cannot (should not) leave the main road.  This fence line provides, perhaps, the best starting point for reaching the island's high point without any noticeable trespassing.  A good place to park can be found by turning right (east) onto an unimproved road just before the cattle guard and following the fence line to an area just north of a small butte.
The Stansbury Island high point (middle
hump) taken along the Provo Bench not
far from the starting point
The route begins by following the fence line on foot as far to the east as possible.  It may be necessary to cross the fence briefly in a flat terraced area to gain access to an upper terraced area at approximately 4,900 feet elevation.  This is one of the levels of the ancient Lake Bonneville (known as the Provo Level) that is quite evident along the west slope of the island.  In this post I will refer to it as the Provo Bench.  Other than occasional ravines cutting through, the Provo Bench provides a level, suitable route for most of the way to the Stansbury Island high point – skirting around the privately owned property.  Approximately 2.8 miles along the route after heading west-northwest, look for a low-lying point listed as "4756" on the map.  Follow with your eyes the ridgeline north of this point as it climbs the side of the island.  This is basically the ridge you need to climb to reach the summit.  As you draw closer to this ridge, it will be to the left (north) of the rocky slope while looking up the drainage.  On some maps the summit appears to be listed as "Castle Rock," but the rock formation known as Castle Rock lies just to the south-southeast of the true summit.  Distance from the starting point to the 6,649-foot summit is approximately 4.2 miles one-way with an elevation gain of 2,369 feet.  Stansbury Island is also a place where there are various forms of Native American rock art, some of which is on private property.  To appropriately gain access to the rock art in the Broad Canyon area, please contact the Six Mile Ranch Company in nearby Grantsville for permission.
View looking south-southeast over Castle
Rock from the Stansbury Island high point
View looking northeast to Antelope Island
from the Stansbury Island high point
A Mormon Cricket, which is very
plentiful on Stansbury Island at times

Native American rock art in the Broad
Canyon area of Stansbury Island

Tuesday, March 19, 2013

Sheep Dip Mountain

Sheep Dip Mountain is a rather strange name to give a mountain, but the term actually refers to a dipping trough that farmers and shepherds use to protect their sheep from external parasite infestations.  This unusually-named mountain is located in a southern extension of the Caribou National Forest  in a "boundary hiccup" area along the Utah-Idaho border.  Based on the official description, the border between Idaho and Utah was set at the 42nd parallel of latitude.  When surveyed back in the late 1800s, however, two surveys (probably coming from opposite directions) didn't match up in the middle.  Rather than change what had already been done, it appears as though they tied into the other one's survey, creating a diamond-shaped area roughly 176 acres in size shared by both Idaho and Utah (see blue area on map).  Having trekked to all six corners of Utah, I became intrigued with this area and I wanted to see if I could locate any survey monuments.  In researching possible routes to access Sheep Dip Mountain, the Idaho side offered the easiest approach.
To reach the starting point for this hike from Salt Lake City, take I-15 north for about 95 miles to the Idaho border.  Continue into Idaho, taking off on the Woodruff-Samaria exit (Exit 3) and turn right towards the east frontage road.  Follow the frontage road back towards the south for about 1.1 miles to the streambed coming out of Burnett Canyon.  Parking is allowed near the streambed as long as vehicles are well off the road to allow farm equipment to pass by.  When I came here I had my hiking partner, Joe, and his wife come along with me.
Sheep Dip Mountain viewed from a
point to the west-northwest
View looking west over I-15 along the
Utah-Idaho border from the "6677" point


We followed a well-established trail for at least one mile up Burnett Canyon before veering to the right (south) towards Sheep Dip Mountain.  At this point we left the trail and made our way over the south ridge of Burnett Canyon into the Trail Creek drainage  staying in the sparsely vegetated areas as much as possible.  A point listed as "6677" on the USGS topographic map provides the first real vantage point, and aligns perfectly with the state boundary line to the west.  Here I spent perhaps 30 minutes looking for any evidence that might indicate a boundary since this point sits at the edge of the shared area, but I found nothing.  From this point our route continued southeastward along a more forested ridge to another point wholly within Utah listed as "6941" on the map.  While we never did come across any survey monuments and/or markings to indicate a boundary, there is most likely evidence in places we did not look.  We ended up going a different route down the mountain than we did coming up  one which I don't recommend since we had to scale several barbed wire fences and cross private property.  Based on the route we took up, distance from the starting point to the 7,057-foot summit of Sheep Dip Mountain is approximately 4.0 miles one-way with an elevation gain of approximately 2,490 feet.
A Sego Lily (Utah State flower) blooms
along the route to Sheep Dip Mountain

Wednesday, February 13, 2013

Nevado de Toluca (Dream Hike List)

I thought I would jump off the beaten path for a post and describe a hike that I haven't been on yet, but wouldn't mind attempting if I were ever in the area again.  The place I'm referring to is the Nevado de Toluca area of south-central Mexico, which is located about 80 kilometers (50 miles) west-southwest of Mexico City.  While I have been to Mexico City before, I was with a package tour then, and I didn't have the time or means to take leave for very long.  Besides, I knew practically nothing about this mountain at the time and I understand very little Spanish to this day.  So what aroused my interest in this volcanic mountain?  I became fascinated with the two lakes in its caldera, which sit at an approximate elevation of 4,200 meters (13,780 feet), and the fact that they were known ceremonial and sacrificial sites during pre-Hispanic times.  Much of the west rim of the crater also rises above 4,500 meters (14,764 feet) elevation.  This is higher than any point in the Lower 48 United States, yet low enough for not having to contend with much perpetual snow.  However considered, it would be a place where acclimatizing to the altitude is necessary for "lowlanders" to do any serious hiking.  The nearby city of Toluca (officially named Toluca de Lerdo) sits at 2,667 meters (8,750 feet) above sea level  so spending a few days there should help acclimatize to the higher altitude.  In my case, I would also take a partner with me that understands Spanish much better than I do.
Approaching Nevado de Toluca from the
northwest  Photo credit: Rob Woodall
According to Google, the directions for reaching Nevado de Toluca are as follows: From Paseo Tollocan (Highway 15) in Toluca, take Paseo Cristobal Colon southward for approximately 1.9 kilometers (1.2 miles) and then turn right (west) onto Calzada del Pacifico.  Calzada del Pacifico eventually turns into Carretera Ciudad Altamirano-Toluca (Highway 134).  Continue westward along Highway 134 for about 13.4 kilometers (8.3 miles) and then turn left (southward) onto Highway 10 to Raices at the sign indicating the park and Volcan de Nevado de Toluca.  Follow this highway approximately 7.6 kilometers (4.7 miles) through Raices and veer to the left (east) on the gravel road leading up to the volcano.  Drive along the gravel road for another 3.5 kilometers (2.2 miles) to a fork where you will again veer to the left around a hairpin turn.  This road continues to climb the mountainside above the timberline to the trailhead, which is approximately another 10.5 kilometers (6.5 miles) beyond the hairpin turn.  It used to go all the way into the crater, but it has now been closed to motor vehicles to preserve the environment.  At the trailhead are several dwellings with sleeping space that can be rented for further acclimatizing to the altitude.
From the trailhead, the pathway climbs approximately 130 meters (427 feet) in the first kilometer (0.6 mile) to reach a saddle along the crater rim, which offers a spectacular view of the surrounding rim and lakes below.  The larger lake off to the right (west) is called Lago de El Sol (Lake of the Sun) while the smaller lake slightly to the left (south) is Lago de La Luna (Lake of the Moon).  A large lava dome separates the two lakes, and rises about 130 meters above Lake of the Sun.  Past the saddle, the trail descends approximately 90 meters (295 feet) to a point near the Lake of the Moon shoreline and then continues around the lava dome to a hut-like structure near the Lake of the Sun shoreline.  Along the southwest rim is the highest point of Nevado de Toluca, which is Pico del Fraile (Friar's Peak) at approximately 4,660 meters (15,288 feet) elevation.  Reaching the summit is most commonly achieved by ascending up the east ridge from the main trail  where some scrambling over rock is involved under dry conditions.  November through March provides the best time to hike Nevado de Toluca as this is the dry season in the area.  Keep in mind that temperatures in the crater are cold year-round, and that frost and snow can occur during any month.  Along with warm clothing, hikers to this area will often bring crampons and an ice axe as a precaution.
The trailhead area of Nevado de Toluca –
Photo credit: Stefan Kontradowitz
View of structure and Lake of the Sun
from the southeast side – Photo credit:
Jomillsjo via Wikipedia