Friday, August 12, 2022

Lake Agnes & The Big Beehive, Alberta

While age has restricted my hiking abilities to some extent, I recently took a trip to The Canadian Rockies and enjoyed a hike that was not too difficult.  The areas around Banff, Lake Louise, and Moraine Lake offer some of the most breathtaking scenery on the planet.  Consequently, its popularity has increased dramatically over the years with large crowds of tourists, congested parking areas, and Parks Canada making concerted efforts to keep things under control.  Just west of Lake Louise lies a smaller, more tranquil lake known as Lake Agnes – named for the original First Lady of Canada, Lady Agnes MacDonald.  In 1901 the Canadian Pacific Railway constructed a teahouse near the northeast shore of the lake as a resting stop for hikers – complete with an interior shelter.  Since 1905, it has served a variety of teas, hot drinks, homemade soups, sandwiches, and other snacks to weary visitors and hikers alike.  I find it amazing that this eatery can function fully  given that there is no electricity, running water, and access is only by horseback or on foot.  Viewpoints of Lake Louise and the Bow Valley can be reached by hiking to The Big and Little Beehives, Devils Thumb, and other points not listed here.

To reach the Lake Louise Village, travel 183 kilometers (114 miles) west from Calgary, Alberta, or 83 kilometers (51 miles) east from Golden, British Columbia along the Trans-Canada Highway (Highway 1).  Upon reaching the boundary of Banff National Park (or any other sites managed by Parks Canada), be prepared to stop and pay the necessary fees.  When we entered, the daily prices (in CAD) were $10.50 for adult (18-64), $9.00 for senior (65 and over), and free for youth (17 and under).  The only instance when free admission is granted is when the highway is being used as a route of travel only with no stops in the park.  Keep in mind that these fees do not include parking and other fees that may be required.  Once at the village, exit Highway 1 and drive west along Lake Louise Drive approximately 4.0 kilometers (2.5 miles) to the parking area just before the Chateau Lake Louise Hotel.  Here things tend to get chaotic with attendants directing you, watching out for people, and trying to find a place to park.  During our visit, it was $12.25 (CAD) per day to park your vehicle, which was not the case not many years earlier.  Plan wisely if desiring to access the Moraine Lake parking area (free for now) – as it often fills up before 5:00am each day and is blocked off until about 7:00pm.  While shuttle buses are available for transporting people in and out of these areas, the online booking process was a total nightmare when we attempted to use it.  My feeling is that no one should have to book a spot on a shuttle bus!  Luckily, we stayed at a hotel nearby, and I was able to walk a short distance to the trailhead.

The iconic view of Lake Louise from
the Chateau Lake Louise Hotel
Lake Agnes Tea House near the
northeast shore of Lake Agnes


The well-marked trail begins near the shoreline behind the Fairmont Chateau Lake Louise Hotel.  Take the right (north) fork that leads up the slope for approximately 1.7 kilometers (just over one mile) before it reaches the first switchback.  At this point the forest opens briefly towards the southeast, revealing the turquoise waters of Lake Louise below.  Keep continuing up the trail for another 0.8 kilometers (0.5 miles) to reach Mirror Lake, where the Big Beehive rock outcrop stretches skyward to the southwest.  About 0.4 kilometers (0.25 miles) beyond Mirror Lake, the trail divides with the right (north) fork leading to the Little Beehive viewpoint.  This trail can be accessed from the Lake Agnes Tea House as well.  Following the left fork leads to a small waterfall below Lake Agnes and then to a set of stairs for the final climb to the teahouse.  Something worth noting – I saw no garbage receptacles at the teahouse, so any disposable material used for serving food on (cups, napkins, plates, etc.) must be packed out by the purchaser.
Daily menu for the Lake Agnes Tea House
To reach the Big Beehive, continue along the trail around the north shore of Lake Agnes.  There may be some snow remaining along the southwest end of the lake before you begin ascending the switchbacks.  Upon reaching the crest of the ridge (about 1.3 kilometers or 0.8 miles from the teahouse), continue to the left (east to northeastward) to the viewpoint structure.  While most of the views from the structure have been blocked by trees, better views can be had from surrounding vantage points, yet be extremely careful of exposure.  Continuing to the right (southwest) along the ridge crest leads to a higher viewpoint known as the Devils Thumb at 2,458 meters (8,064 feet) elevation.  This route involves Class 2 scrambling in some places and caution must be exercised not to dislodge rocks onto hikers below.  For the return route, you can either go back the way you came or descend the southeast side of the ridge towards Lake Louise.  Upon reaching the junction (approximately 1.0 kilometers or 0.62 miles beyond the ridge crest), take the left (northeast) fork back towards Mirror Lake – unless a longer hike is desired.  Total distance from the trailhead to the Big Beehive structure is approximately 5.3 kilometers (3.3 miles) one-way with an elevation gain of about 520 meters (1,706 feet).  For the Lake Agnes Tea House, the distance is approximately 3.5 kilometers (2.2 miles) one-way with an elevation gain of about 385 meters (1,263 feet).

View looking over Lake Louise and
the hotel from The Big Beehive
View looking across Lake Agnes
towards the teahouse

Monday, September 28, 2020

Mount Agassiz & Naturalist Basin

For a more extensive hike into the Uinta Mountains, the Naturalist Basin is a favorite place that many hikers enjoy going to.  This area features a series of lakes that are at or above 10,500 feet elevation close to the timberline.  Along the west boundary of the basin is Mount Agassiz (pronounced "ag-uh-see"), which was named after the Swiss-born American geologist and naturalist, Louis Agassiz.  A scramble up the slopes of this mountain offers spectacular views of Naturalist Basin and the surrounding landscape.  To enjoy the beauty of the Naturalist Basin more fully, this hike can be turned into a two-day overnighter – the first day in and the second day out.  When camping, be sure to observe all wilderness regulations and exercise no trace camping as much as possible.  Always check the weather forecast before hiking into the wilderness area and be prepared for sudden storms that include hail, lightning, and strong wind.  Keep in mind that subfreezing temperatures can occur at night during any time of the year at this altitude.

To reach the West Highline trailhead coming from the west along I-80, take the exit at Silver Creek Junction (Exit 146) and continue southward along U.S. Highway 189.  Take the Park City/Kamas exit (Exit 4) and turn left (eastward) onto SR 248 for approximately 11.5 miles to Main Street in the town of Kamas.  Turn left (north) onto Main Street for two blocks, then turn right (east) onto Center Street (SR 150) and continue about 34 miles over Bald Mountain Pass.  Look for the turnoff to the right (east) just beyond the Summit County sign.  Once on the turnoff, veer to the right (south) to reach the trailhead.  From east along I-80, take the Front Street exit (Exit 5) in Evanston, Wyoming and turn left (east) onto SR 150 to head out of town.  Utah is entered after about 22.5 miles, yet the route number remains the same.  Around 21 miles beyond the border, look for the turnoff to the left (east) just before the Duchesne County sign.  After turning onto the turnoff, veer to the right (south) to reach the trailhead.  A $6.00 fee is required for a one to three-day recreational use pass that can be paid at the self-service fee box near the trailhead.
West Highline trailhead signs –
Photo credit: Girl on a Hike
View looking over Blue Lake
from east ridge of Mount Agassiz


At the trailhead is a wilderness registry, which is always wise to fill out so that officials know your whereabouts and your expected time of return.  After all, this is a huge wilderness area that stretches nearly 60 miles from east to west, and it becomes quite easy for inexperienced individuals to get lost.  Also, be aware and considerate of backpackers traveling with horses along the trail.  The Highline Trail begins by dropping slightly to its junction with the Mirror Lake extension trail at about three-quarters of a mile.  Continuing to the left (eastward) towards the Naturalist Basin, the route falls below 10,000 feet elevation before climbing gradually towards Scudder Lake at approximately 2.0 miles.  About 2.1 miles beyond Scudder Lake is the Naturalist Basin trail junction to the left (northeast).  Here the climb increases a little before leveling off some at the Jordan Lake trail junction just over one mile further.  At this point you can choose which direction to take for the lake loop tour around the Naturalist Basin.  To continue on to Mount Agassiz, veer to the left (westward) and continue up the trail that goes between the Morat Lakes towards Blue Lake.  Mount Agassiz looms to the northwest of Blue Lake as you make your way north of the lake up the steep rocky slope.  While there is some exposure along the north side of the east ridge, the climb is more of a scramble up to the 12,428-foot summit of Mount Agassiz.  Great care must be taken, however, while climbing over any loose rock.  Total distance from the West Highline trailhead to the summit of Mount Agassiz is approximately 6.8 miles one-way with an elevation gain of about 2,490 feet.  This factors in an elevation loss of 440 feet.  The loop around the Naturalist Basin is approximately 3.7 miles – added to the 5.2 miles to get there.
Scrambling up the east
ridge of Mount Agassiz
View of the Naturalist Basin near
the summit of Mount Agassiz
Photo credit: Outdoor Project

Saturday, August 29, 2020

Bald Mountain, Utah

Located at the west end of the Uinta Mountains in northeastern Utah is a popular area known as Mirror Lake.  During the summer months, it draws lots of fishermen and recreational enthusiasts from all around to escape city life and cool off from the hot temperatures below.  Access to this area is made possible by the scenic Mirror Lake Highway, which features the highest asphalted highway in Utah at 10,715 feet elevation.  The road is closed to automobiles and opened to snowmobiles during the winter months.  About one mile west-southwest of Mirror Lake is Bald Mountain – so called because of its rounded top that is void of trees.  Though not a particularly strenuous hike, its summit is higher than any point in the Wasatch Range.  It gives you that feeling of being "on top of the world" upon reaching the summit.  Due to its proximity to the Mirror Lake Highway, this hike can become quite crowded, particularly during the weekends – so plan accordingly.  It is always wise to check the weather forecast as well as thunderstorms are frequent in the area, especially during the late summer season.

To reach the Bald Mountain trailhead along I-80 from the west, take the exit at Silver Creek Junction (Exit 146) and continue southward along U.S. Highway 189.  Take the Park City/Kamas exit (Exit 4) and turn left (eastward) onto SR 248 for approximately 11.5 miles to Main Street in the town of Kamas.  Turn left (north) onto Main Street for two blocks, then turn right (east) onto Center Street (SR 150) and continue about 29 miles to Bald Mountain Pass.  The trailhead is on the left (north) up a short dirt road to a parking area.  From the east along I-80, take the Front Street exit (Exit 5) in Evanston, Wyoming and turn left (east) onto SR 150 heading out of town.  Utah is entered after about 22.5 miles where the route changes to Utah 150.  Continuing southward for about another 26 miles, the trailhead is reached – where you will turn right (northeast) next to Bald Mountain Pass up a short dirt road.  A $6.00 fee is required for a one to three-day recreational use pass that can be paid at the self-service fee box at the trailhead.
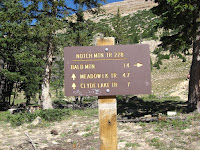
Directional sign at the Bald Mountain Trailhead
Directional sign near the Bald
Mountain Trailhead
Ascending the trail with the east face
of Bald Mountain in the background
Before starting on the hike, be sure to carry plenty of water as there are no drinking sources along the entire route.  Since there is minimal shade along the trail, it is also wise to wear a hat and use plenty of sunscreen for sunburn protection.  Upon leaving the trailhead, the path soon begins to ascend the south slope of the mountain through several switchbacks.  There are places where it becomes necessary to climb up rocky steps, so watch your footing.  At just over one-half mile, the trail curves onto the southwest ridge and flattens out some through the last patch of low-lying trees.  Once out of the trees, the path traverses through an alpine tundra landscape where marmot sightings become common.  Near the east face of the mountain, the trail becomes more exposed and steepens as it switchbacks again before reaching the 11,943-foot summit of Bald Mountain.  Keep in mind that frequents rests may be necessary due to the thinner air at this altitude.  On clear days, the Wasatch Mountains are visible to the southwest and Mirror Lake is visible immediately below to the east along with various peaks of the Uinta Range.  Distance from the Bald Mountain trailhead to the summit is approximately 1.4 miles one-way with an elevation gain of about 1,185 feet.
Approaching the final summit
block of Bald Mountain
View overlooking Mirror Lake
from the summit of Bald Mountain

Wednesday, December 6, 2017

Emerald Lake of Mount Timpanogos

Emerald Lake is a small lake that sits approximately 10,350 feet elevation next to the huge prominence of Mount Timpanogos' main summit.  It is fed mainly by a dwindling glacier along the north slope of the summit ridge that separates the main and south summits.  A moraine basically bisects the lake – which may appear to be a perfect spot for spending the night, yet wilderness regulations prohibit camping within 200 feet of the shoreline.  Though climbing the glacier provides a shorter route to the main summit than the Timpooneke route, it is not recommended without the use of crampons and an ice axe – along with the skill of using them.  Not far from the northwest shore of Emerald Lake is a shelter that was constructed in 1960 for the masses of people that used to hike Mount Timpanogos.  Since this practice has now ceased and the area was designated a wilderness, the shelter sees much less use today.  It still, however, provides better protection from storms and the elements than the metal hut at the main summit does.  Be prepared for sudden changes in weather and keep in mind that temperatures at the lake and summits are often much cooler than at the trailheads.  This post describes the Aspen Grove Trail, or eastern route up Mount Timpanogos.
To reach the Aspen Grove trailhead from I-15, take the Orem 800 North exit (Exit 272) and turn east along 800 North (SR 52) to the Provo River (about 3.7 miles).  Take the left ramp onto U.S. Highway 189 towards Provo Canyon (northeast) and continue another 6.9 miles to the SR 92 turnoff just past the Provo Canyon Tunnels.  Turn left (northwest) onto SR 92 and continue approximately 4.8 miles, where you will pass the Sundance Mountain Resort.  The road to the parking area is just past the fee station on the left (south) next to the Theater-in-the-Pines Campground in Aspen Grove.  Again, this area can get quite congested with vehicles, especially on weekends – so plan accordingly.  Be sure to pay any associated day use fees to avoid fines and possible vehicle impounding.
The main summit of Mount
Timpanogos along the
Aspen Grove Trail
The small glacier on Mount
Timpanogos that feeds
into Emerald Lake


Beginning near the northwest corner of the parking area, the trail makes a gradual climb near the bottom of the canyon for about 0.9 miles before reaching the switchbacks to Primrose Cirque.  Depending on seasonal runoff, it's not uncommon to see small waterfalls cascading over the cliff bands in this area.  At just over 2.0 miles, the trail makes a general southwest traverse across the upper part of the cirque to more switchbacks of shorter length that seem endless.  Eventually the terrain levels out into a basin with small lakes at approximately 4.1 miles – where wildflowers often blanket the landscape during the late summer season.  Another 0.9 miles brings you to Emerald Lake and the shelter nearby.  Though in a wilderness area, the shelter is a historic structure that should be preserved for protection on the upper part of the mountain.  For a non-technical approach to the main Timpanogos summit, continue westward along the trail – maybe a third of a mile past the shelter to a junction on the north-facing slope.  The trail on the left (south) is a shortcut to the ridge saddle versus taking the trail on the right (north) that connects with the Timpooneke Trail.  Snow, however, often blocks this shortcut route well into the summer months, which may necessitate taking the longer route for a safe ascent to the saddle.  It's about one mile from the Emerald Lake shelter to the saddle using this north face shortcut route.  A lesser visited summit that offers spectacular views of the landscape below is Roberts Horn, which was named after the late Eugene L. Roberts – often nicknamed "Timp" Roberts.  While there is no clearly established trail to this summit, the easiest approach is along the southwest ridge for about a half-mile just past the shelter.  Distance from the Aspen Grove trailhead to Emerald Lake is approximately 5.0 miles one-way with an elevation gain of about 3,450 feet.  To the 11,749-foot main summit of Mount Timpanogos; the distance is around 6.9 miles one-way via the non-technical route with an elevation gain of approximately 4,850 feet.
The Emerald Lake shelter provides
protection and rest for hikers
Mountain goats hug the rocky slopes
on the ridges of Mount Timpanogos

Tuesday, September 26, 2017

Mount Timpanogos

The Mount Timpanogos area is one of the more popular attractions along the Wasatch Front with Timpanogos Cave up American Fork Canyon and the Sundance Mountain Resort up Provo Canyon.  Though not the highest point in the Wasatch Range, Mount Timpanogos (referred to by many locals as simply "Timp") stands as a prominent landmark against the Utah Valley and beyond.  The name comes from the Timpanogos Tribe who were an indigenous people of Shoshone descent that lived in the area before the coming of the Mormon Pioneers.  Examining the outline of the mountain reveals the legendary character of a sleeping princess – lying on her back with her long hair flowing downward and knees bent upward.  At one time there used to be an annual "Timp Hike," which would literally draw thousands of people onto the mountain slopes in one day!  This obviously resulted in adverse effects to the delicate ecosystem – consequently, it was discontinued in 1970.  By 1984 the area was officially designated a wilderness area to protect the environment.  While the route to the summit of Mount Timpanogos is not particularly difficult, it is a long hike that requires a full day and strong perseverance.  Bring plenty of water along with protection from the sun as the upper parts of the trail extend above the timberline and have no real water sources.  This post describes the Timpooneke Trail, or northern route to Mount Timpanogos, which provides the least amount of elevation gain to the summits.
To reach the Timpooneke trailhead from I-15 coming from the north, take the Timpanogos Highway exit (Exit 284) and turn left (east) onto SR 92 to the mouth of American Fork Canyon (about 7.5 miles).  If coming from the south along I-15, take the Pleasant Grove Boulevard exit (Exit 275) and turn right (northeast) onto Pleasant Grove Boulevard.  At the next traffic signal turn left (northwest) onto 2000 West, which turns into North County Boulevard to the Mount Timpanogos LDS Temple.  Continue following this road northward to 11000 North (SR 92) and make a right (east) turn towards the mountains (about 6.0 miles from Exit 275).  The previous time I entered American Fork Canyon, the entry fee was $6.00 per vehicle for a one-to-three day pass, unless you have an "America the Beautiful" Parks Pass.  Proceed up the canyon past the Timpanogos Cave Visitor Center (about 2.25 miles further) and stay right (east) along SR 92 to about 8.1 miles beyond the entrance station.  Turn right (northwest) onto the Timpooneke road and drive approximately one quarter-mile to the parking area on the left (south) at the trailhead.  This area can become quite congested with vehicles, especially on weekends – so plan accordingly.
Scout Falls near the lower
part of the Timpooneke trail
Approaching Timpanogos Basin
with main peak in the background


The trail begins at the informational signs, where there is also a trail registry for registering your names.  It never hurts to take a few moments and absorb the information on these signs as it may save you some trouble down the road.  Upon entering the Mount Timpanogos Wilderness Area a little ways past the signs, the trail continues to the edge of a large meadow where it begins to ascend around the west side.  At around 1.4 miles along the trail at the end of the first full switchback is a sign that indicates the access to Scout Falls.  This is a nice spot for a rest, and depending on the season there can be huge amounts of water flowing over the edge – creating a thunderous roar.  Back on the main route above Scout Falls, the trail enters a basin area and eventually curves northward for about one-half mile before turning southward again across talus slopes.  Being on northerly and easterly facing slopes, snow often remains in this area well into the summer months.  When hiking across any snowfield, be cautious not to slip and fall into possible hidden voids that may exist beneath the surface.  At approximately 4.8 miles along the trail, the Timpanogos Basin is reached as you transition from pine forests to alpine tundra.  Elevations in this basin area can range anywhere from 10,000 to 10,600 feet.  During the 1950s an Air Force B-25 bomber crashed northwest of Timpanogos Basin just below the Middle Summit – killing everyone on board.  Parts of the wreckage can still be found by following the right (northwest) fork of the trail at the "Toilet" sign for about 0.75 miles along the terrace.  Since the accident, the Middle Summit of Mount Timpanogos is often referred to as "Bomber Peak."
One of two engines from a B-25 bomber
that crashed on Mount Timpanogos
The main peak of Mount Timpanogos
as viewed from the ridge saddle


About 500 feet along the left (southwest) fork of the trail from the "Toilet" sign is another junction that determines the route to the summits, or to Emerald Lake.  Take the right (northwest) fork towards the summits, which ascends up the ridge to the west approximately 1.5 miles further to reach the saddle.  Once at the ridge saddle, while most hikers elect to go on to the main summit, you can also hike to the other summits as well along the summit ridge.  Keep in mind, however, that there are no clearly established trails to the other summits – and that a greater amount of time and effort will be required to reach them.  At the main summit of Mount Timpanogos is a metal hut that allows some protection from the elements while taking in the panoramic views below.  Do not take shelter in this hut during a thunderstorm though – as it becomes a prime attraction for lightning.  Distance from the trailhead to the 11,749-foot main summit of Mount Timpanogos is approximately 7.2 miles one-way with an elevation gain of about 4,400 feet.
The metal hut at the main
summit of Mount Timpanogos

Monday, August 28, 2017

The Hamongog Area

About a half-mile west of the Dry Creek Canyon trailhead is the Schoolhouse Springs trailhead, which leads through an area known as the Hamongogs.  A hamongog is a Biblical term that refers to a valley where the Army of Gog and Magog was buried (see Ezekiel 39:11-15).  In the case of this mountain trail, it is more of a flat open meadow area surrounded by denser forested areas.  Due to recent development in the area, greater efforts have been necessary to maintain public access to the Lone Peak Wilderness Area, which begins at the wilderness sign at the First Hamongog.  Each year during the Alpine Days events in August, there is supposedly a community hike to Lake Hardy that begins at the Schoolhouse Springs trailhead at around 5:30am.  The year I attempted to go on this hike with them, however, the event was canceled, and I was basically left on my own to do the hike.  Since this hike is located on a south-facing slope, it is important to bring lots of drinking water and take this hike during the cooler times of the day.  The autumn season is a particularly delightful time to hike the Hamongog area when temperatures are more moderate and the leaves are changing color.
Reaching the Schoolhouse Springs trailhead is very similar to reaching the trailhead for Dry Creek Canyon.  Coming from the west along SR 92, turn left (north) onto 5300 West, which becomes Main Street going into the town of Alpine.  Continue straight through the traffic circle along Main Street and turn right (east) at 200 North.  Turn left (north) again onto Grove Street (200 East) and follow it approximately 1.6 miles to Alpine Cove Drive.  Now turn left (northward) onto Alpine Cove Drive and then left (northward) again onto Aspen Drive.  Continue following the graded dirt road to the gate and parking area near the Lehi water tanks.  If coming from the east along SR 92, turn right (north) onto 4800 West, which curves and turns into Canyon Crest Road to the traffic circle (about 1.25 miles from SR 92).  At the traffic circle, turn right (north) onto Main Street and follow the remaining previous directions to reach the trailhead.
Directional sign in the First Hamongog
area just beyond the wilderness sign
View of the Second Hamongog
with Big Horn Peak in the background


From the water tanks to the First Hamongog, the trail is basically an old graded road that switchbacks up the mountainside – a 1,500-foot elevation gain in about 1.8 miles.  Much of this area is private property; so it's important to stay on the established route as much as possible.  Upon reaching the First Hamongog and continuing into the wilderness area, the trail splits – the left (west) fork leads to the Second Hamongog while the right (east) fork leads to the Dry Creek Canyon area.  Taking the left fork, the trail ascends approximately 1,100 feet for about 1.4 miles to reach the 8,130-foot elevation of the Second Hamongog meadow.  Here you are surrounded by pine trees and the spectacular backdrop of the Draper Ridge to the north.  This is a good stopping point for those lacking the strength to hike further and/or for spending the night.  The route to Lake Hardy continues by taking the right (east) fork in the Second Hamongog meadow, which ascends up the drainage towards the ridgeline to Big Horn Peak.  As the vegetation becomes sparser with increasing altitude, cairns mark the path to take.  The last time I hiked this trail, I made it to a point that I refer to as "Ridge Viewpoint," which offers great views of the surrounding landscape.  Years earlier, I hiked to the south summit of Lone Peak from the Second Hamongog with my hiking partner, Joe.  We took the left (north) fork of the trail towards Lone Rock for a ways and then veered more towards the north up a very steep drainage.  Though this may be considered the shortest hiking distance to the summit of Lone Peak, it is certainly the steepest as well – which is quite brutal on your legs and feet.  Total distance from the Schoolhouse Springs trailhead to the Second Hamongog is about 3.2 miles one-way with an elevation gain of 2,600 feet.  To the south summit of Lone Peak the distance is approximately 4.8 miles one-way with an elevation gain of around 5,700 feet.
View of Box Elder Peak from the Ridge
Viewpoint along the Lake Hardy Trail
View looking northwest at the north summit
of Lone Peak  Photo credit: WordPress

Friday, July 7, 2017

Horsetail Falls

Tucked in the northern reaches of Utah Valley near the town of Alpine, Utah is a waterfall known as Horsetail Falls.  Though not as popular as other nearby waterfalls, Horsetail Falls has a beauty of its own that is well worth hiking to see.  From a fairly narrow channel at the top, the water spreads out as it cascades onto the rocks below.  The amount of water varies depending on seasonal runoff and the time of year visited, yet each season provides its own special type of beauty.  There are several stream crossings along the trail that can cause a little apprehension during heavy runoff, but most have narrow log bridges to cross on.  At the end of Dry Creek Canyon sits the Pfeifferhorn, which is a pyramid-shaped peak that forms part of the Salt Lake-Utah County line.  Continuing up the Dry Creek Trail beyond Horsetail Falls eventually takes you to the north saddle of Box Elder Peak.
To reach the trailhead for Dry Creek Canyon along I-15 coming from the north, take the Timpanogos Highway exit (Exit 284) and turn left (east) onto SR 92.  Follow this route for approximately 5.6 miles and turn left (north) onto 5300 West, which becomes Main Street going into the town of Alpine.  Continue straight through the traffic circle along Main Street and turn right (east) at 200 North.  Turn left (north) again on Grove Drive (200 East) and follow it the remaining distance to the trailhead (about 2.5 miles).  At the junction with Oakridge Drive, turn right (southeast) briefly to cross Dry Creek before continuing northward again past the rodeo grounds to the parking area.  If coming from the south along I-15, take the Pleasant Grove Boulevard exit (Exit 275) and turn right (northeast) onto Pleasant Grove Boulevard.  Turn left (northwest) at the next traffic signal onto 2000 West, which turns into North County Boulevard to the Mount Timpanogos LDS Temple.  Continue following this road northward, which eventually curves and turns into Canyon Crest Road to the traffic circle (about 7.3 miles from Exit 275).  At the traffic circle, turn right (north) onto Main Street and follow the remaining previous directions to reach the trailhead.
Horsetail Falls (white area) as seen
from a lower viewing point near trail
Hiker crosses one of several
narrow log bridges along the trail


Be prepared for large crowds during weekends and holidays that can fill the parking lot to capacity.  The well-marked trail begins at the east edge of the parking lot and passes an informational board as it curves northward, then northeastward.  Much of the first part of the trail is open with less shade, but it soon narrows upon entering the more forested areas towards the canyon.  There are some fairly steep portions along the way along with a few level areas for resting and catching your breath.  At around 1.2 miles from the trailhead, you reach a grassy meadow area know as Shingle Mill Flat, which provides a great place to camp and observe wildlife.  Since this is part of the Lone Peak Wilderness Area, no camping is allowed within 200 feet of any water sources, and of course, "Leave No Trace" camping techniques apply at all times.  Beyond the meadow, the trail continues up the canyon with frequent paths forking off to the left towards Dry Creek.  A good lower viewing point of the waterfall lies just over a half-mile past the meadow at around 7,000 feet elevation.  Upon reaching the Deer Creek-Dry Creek directional sign, go to the left (northward) to reach the top of the waterfall.  At this point, various paths with moderate exposure lead to different spots for viewing the waterfall.  Extreme caution must be exercised – particularly around the waterfall – to avoid slips and falls on wet surfaces.  Distance from the trailhead to the top of Horsetail Falls (7,250 feet) is approximately 2.0 miles one-way with an elevation gain of about 1,600 feet.
Deer Creek-Dry Creek directional
sign not far from Horsetail Falls
Close-up view of Horsetail Falls